Tag: biology

The DNA bases are now fully colored: red with green and blue with yellow. Green and blue are always the longer bases. The ends of each base pair are hidden behind the topmost strands of DNA backbone.

How to (correctly) draw DNA

Hello good friends! Here are two fun facts about me:

The combination of these two items means I get very (very) bothered by incorrect rendering of DNA.  Would you like to know how to draw DNA correctly?  Well, you are in the right spot.  Let’s get started.

Draw an X.  It should be 1.5 times wider than it is tall.  If you are drawing by hand, use a ruler.  The proportions are important here.

A black 'X' which is 1.5 times wider than it is tall.

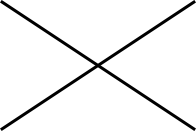
Now draw a lot of Xs on top of that one, so you get a nice ziggity-zaggity pattern.

Seven Xes arranged vertically, stacked so that they touch and make a criss-cross pattern.

To illustrate my next point, it’s important to tell the two strands apart, so we’re going to use our magic poof button and color one strand red and one strand blue:

The same zig-zag pattern as before, but one zig is red and the other zag is blue.

poof

Right now the spacing between the two strands is exactly even, but that doesn’t happen in real DNA.  Perhaps you have heard of the major and minor grooves.  Well, we’re going to move the red strand down about 50% of an X-height so that there is unequal spacing between the two strands1:

There are still two vertical zig-zags, one red and one blue. They are slightly vertically offset to represent the major and minor grooves of the DNA.

Voila!  Now we have our skeleton to start drawing the DNA ribbons.  For each leg of the DNA, we’re going to draw a ribbon shape over top it.

The red and blue strands are now at 50% opacity. An s-shaped ribbon segment is drawn in black over one of the straight lines on the red strand of the DNA skeleton.

Practicing drawing consistent squiggles for your ribbons; I find the more evenly I can draw my ribbons the better the finished product looks.  Draw ribbons for both strands.  I like to do one strand first and then the other.

As before, the skeleton zig-zags are at 50% opacity. The same S-shape has been copied, rotated, and translated so that a full black ribbon covers the red strand from top to bottom. The X-skeleton is no longer shown. Ribbons for both the red and blue strands are completely drawn; they have been color-coded red and blue to help differentiate which strand is which.

Now comes a really fun part!  We’re going to erase some of the lines to show which parts of the strands are on top of the other strand.  BE CAREFUL.  There is a wrong way to do this.

Allow me to explain.  There’s this idea in chemistry called chirality.  The fancy definition for this is “non-superimposable mirror images.”  Let’s break that down for easier digestion.  “Mirror images” is easy enough to understand.  If you take a molecule and swap it left-to-right, you have its mirror image!  Easy peasy.

What about “non-superimposable”?  That means that if you take the molecule’s mirror image, no matter how you rotate, translate, or send wishful vibes at it, it won’t match up perfectly with the original.  A good example on the macro-scale is a pair of gloves.  You have a right glove and a left glove, and they can mirror each other, but you’ll never get them to stack on top of each other perfectly.  In chemistry, we actually use the terms “right-handed” and “left-handed” for molecules, to illustrate the exact same concept.

Chirality is very important in biology.  Sugar is chiral:  one mirror image will feed your brain, the other will do absolutely nothing for your body.  It’s even more important with pharmaceuticals:  often one enantiomer2 will save your life and the other is poison.  No bueno.

DNA is a chiral molecule.  That means that how we choose which way the helix turns is important: one way you will live to see another day, the other and your complete genetic blueprint is lost.  Pay attention to the pretty picture:

The red and blue ribbons' insides are now filled opaquely, with less saturated red and blues. The twist of the helix is much more apparent: the strands in front go from right-to-left as they go top-to-bottom. A large arrow overlays the image pointing in the same direction.

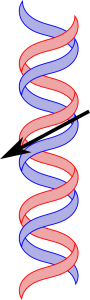
This DNA is “right handed”: as the helix twists from top to bottom, the DNA twists from right to left.  That means that if you choose a strand in the front of the DNA, it should go top-right to bottom-left3 and NOT the other way around.

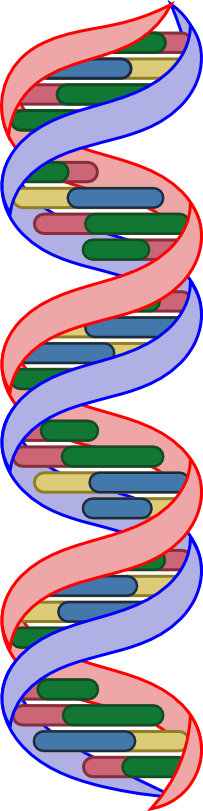
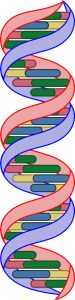
Whew!  That was a lot of work!  But now we have the DNA ribbons (aka backbone) completely drawn.  Next up: adding bases!  Let’s pencil them in:

The same ribbons as before are depicted, but without the arrow. Instead, ten base pairs are depicted. Each base pair is a rounded rectangle with a division 1/3 of the way across its length. The first and fifth base pair are depicted only as circles, over top where the red and blue ribbons cross.

There are some important things to note about the base pairs:

  • They come in pairs.  Each little log I’ve drawn represents two bases.
  • Some of the bases are longer than the others.  Each pair is made up of a short base and a long base.
  • There are exactly ten (10) base pairs per full helical turn.  Exactly.  The best way I’ve found to draw this is to put a little circle where the two strands overlap, and put exactly four base pairs in-between.  The circles won’t show up in the final drawing, but they’ll help you space things out.

Ready to finish up?  I’ve erased the parts of the bases that are covered up by the backbone, and colored them so they look all nice and paired up.  Remember that adenine (a big base) will always pair with thymine (a little base), and guanine (a big base) will always pair with cytosine (a little base).4  Color accordingly.

The DNA bases are now fully colored: red with green and blue with yellow. Green and blue are always the longer bases. The ends of each base pair are hidden behind the topmost strands of DNA backbone.

And now for something (slightly) different

Now, my dearest readers, you have all the tools to count the errors of the DNA depicted in Jurassic World:

Let’s tally the sins, shall we?

  1. This DNA is far too thin: it should be about half as tall as it currently is.
  2. The grooves are evenly spaced.  No major or minor groove.
  3. WRONG CHIRALITY!  Aaaaaah!
  4. I count ~20-24 base pairs per helical turn.  Neeewp newp newp.

And now we know why Addie wanted to flip a table during certain scenes of Jurassic World.  Or basically any time DNA is depicted in the media.  Don’t be that guy:  learn to draw DNA correctly.  (plz for me)


I adapted this tutorial from two places:


A primer on osmotic pressure: or the story of how I learned to love the nasal rinse

I have been down with the flu for… gosh, it feels like two weeks now.  Not fun.

I’ll spare you the gory details, but as I’ve been floating around my home in a haze of flu-induced bleh, I am constantly reminded of how much I’ve fallen in love with the nasal rinse as one of my go-to sickness helpers.  If you asked me two years ago about nasal rinses, I would’ve said, “no way never nope not going to happen.”  You, gentle reader, may also be in this boat.  Maybe you had the same misconception I had: that this would hurt.

Thinking about purposefully pouring water up your nose, at least for me, is reminiscent of the days when Dad made you laugh at the dinner table and you snorted out milk… ow.  Accidentally get water in your nose from the pool or shower?  OW.  Nasal rinses don’t hurt, and the reason why has to do with osmotic pressure.

What is osmotic pressure?  Well, let’s back up a little bit and first talk about the concept of entropy.  I get a little irked at people who describe entropy as “chaos.”  It kind of is, I guess.  But that dramatically over-simplifies things and leads to a lot of misunderstandings (“how can anything ever be ordered if the natural state of the universe is chaos?”).  “Chaos” also sounds really unappealing, where entropy, when properly understood, is quite a beautiful, symmetrical, thing.

Let’s start with an example.  Say you have this box, with two different kinds of gas on either side, separated by a barrier:

A rectangular box with a solid line drawn down the center. There are 12 red spheres on the left and 12 blue spheres on the right.

I’m going to call them “red” gas and “blue” gas. Because I can.

So what happens if we remove the barrier?  Think about it for a minute.  It’s not a trick question.  Which of these would happen:

Three boxes similar to the one above are pictured, but with the center barrier almost entirely removed. In graphic A the red balls are on the left and blue balls are on the right. In graphic B, the balls are evenly intermixed. In graphic C, the blue balls are now on the left and the red balls are on the right.

If you said B, you’re right.  Entropy is a movement of the system toward everything being more spread out and equal.  This appeals to my sense of symmetry in the universe, and hopefully it appeals to yours too.

Entropy is also temperature dependent.  Let’s try the same example, but say we have two solids on either side of the chamber.  Think of them like ice in a freezer:

The same box as before is pictured, with the barrier fully lowered. On the left is a tightly-packed pyramid of red balls. On the right is an equally-packed pyramid of blue balls.

“Red” ice and “blue” ice, amIright?

So what happens if we open the barrier?  Remember that these are solids, like your keyboard or emergency coloring book (everybody has one of those, right?).

Three choices are shown. The barrier is removed in all three. Graphic A shows the pyramids in the same place: red on the left, blue on the right. Graphic B shows the two pyramids with some of the balls swapped so that both pyramids are a mixture of colors. Graphic C shows the blue balls now on the left with the red balls on the right.

If you said A, you’re right.  Solids don’t have enough energy to mix around… they would if they could (entropy), but they’re just too stuck-together for that to happen.  You can imagine adding heat to our ice (after all, heat is a form of energy)… as soon as our blocks melt, the liquids will mix together, exactly as you would expect.

Speaking of liquids, I think we have enough in our toolkit to talk about… OSMOTIC PRESSURE (dun Dun DUN).  Osmotic pressure discussions are often drawn with a U-shaped contraption for various reasons, but I’m going to mostly stick with the box diagrams for clarity’s sake.  Let’s change a few features of the box, one by one.  First, we’ll fill the whole box with water, and our balls are now salt (or “ions” if you want to be super fancy):

The original box: barrier in place, red balls floating on the left, blue on the right. A light turquoise background now fills the box.

With me so far?  Now, let’s cut little cheese-holes in the barrier so that water can get through it, but not our big, bulky salt/ion molecules.

The graphic is as before: red and blue balls floating in water, separated from each other by a barrier. The barrier, however, is now represented by a dashed line.

This sort of barrier is permeable (passable) by water, but not by ions.  Dare I say it’s even… semi-permeable.  Semi-permeable membranes appear all sorts of places.  They’re in the grocery store contraption that gives you filtered water.  Relevant to our discussion today: almost everything in YOU is a semi-permeable membrane.  Your blood vessels are semi-permeable.  The mucus membranes in your nose are semi-permeable.  The awesome layer around your brain that only lets really important things through… you guessed it, is semi-permeable.  Let’s file this information away in our back pocket and bring it back in just a bit.

Alrighty, alrighty.  One last change to our box before the magic happens.  We’re going to make the left-most and right-most sides of the box movable.  Effectively, the volume on each side of the box can change.  Maybe it would be helpful to think of the top and bottom of the box as elastic bands;  the sides can sloosh back and forth like a slinky.  Make sure you can properly conceptualize this, because it gets important very quickly:

The box is now shown with double-ended arrows on the left and right side, indicating that the walls of the box can move freely.

Our picture so far should behave just like our boxes from before.  Now!  Are you ready for the magic change?!  We’re going to wave our magic wand and *poof* disappear all of the ions/salt from one side of the box.  POOF:

All of the blue balls have been removed from the right side of the box. Now only red balls remain, and only on the left.

poof

Aaaah!  Oh no!!  Things are NOT even.  Not even at all!!  Entropy simply will not have this.  So what does the system do to compensate?  Entropy will drive the system walls to shift, moving water over from the empty side to the salt-concentrated side.  The concentration of the system will balance out.  Entropy has made things even, yet again!!

The walls of the box have both shifted to the left. The semi-permeable membrane is now on the right-most edge of the box, and the red particles are arranged evenly throughout the new space. The old box position is outlined in a light dashed line, showing the extent of travel.

I imagine the water going “slooosh” as it shifts from the right side to the left.

That’s osmotic pressure in a nutshell.  “But wait!” the astute observer might notice, “you didn’t say anything about pressure at all!”  You are absolutely right, dear reader.  There is an almost-linear relationship between pressure and volume everywhere you look.  If you increase the pressure inside of a balloon, say, the volume will also increase.  By pushing water into the left side of the box, we increased the volume and thus also increased the pressure.  BOOM.  Osmotic pressure.  Maybe the U-diagram will make a little more sense now, too.

A tube shaped like the letter U is shown. At the top left of the tube is a grey rectangle labelled "pressure sensor." A semi-permeable membrane is indicated with a dashed line at the bottom center of the U. The left side of the tube has red balls in it, the right side has none. Arrows indicate the flow of water: the right side has an arrow pointing downward and less water; the left side has more water and an arrow pointing up.

As water flows from the low-concentration (right) side of the tube to the high-concentration(left) side of the tube, the pressure on that side increases, which we can measure with the pressure sensor.

Wow!  What a long-winded post.  I hope you’re all sticking with me so far!  Because I’m about to tie this up in a tidy bow.  Your nasal mucus membranes are semi-permeable membranes.  Your body is also naturally salty (What do boogers taste like, amIright?  *backs out of room slowly*).  If you put water in your nose, it will disrupt that delicate salty balance and your nose will actually ABSORB the water to try to balance it out.  OW!  Water in your eye?! Ow!  Too much water into your blood vessels?  Dead!

But what if we use a water solution that has the exact same salt content as your body?  Water will be flowing neither in or out.  It feels natural.  This is what gives us nasal rinse, eye drops, and saline (aka “salt”) IV bags.  We call these exactly-right salt concentrations isotonic.  Iso = equal, right?  And if you know a smidge of Latin, I bet you can guess what hypotonic and hypertonic are.  (Spoiler: lower concentration and higher concentration than body salt, respectively.)

With the proper isotonic nasal rinse solution, flushing out my nose has never felt cleaner and more refreshing.  You’re welcome for that detail.  Now rinse away, happy readers, and revel in the beauty of breathing through your nose because I am going back to bed.